
Welcome to our Integration Manual
The hAPI API is designed around REST principles. Our API features intuitive, resource-oriented URLs, accepts form-encoded request bodies, and returns JSON-encoded responses, utilizing standard HTTP response codes, authentication methods, and verbs.
You can utilize the hAPI API in test mode, ensuring no changes to your live data or interactions with external services. The API key used for authentication determines whether the request operates in live mode or test mode.
Please note that the hAPI API does not support bulk updates; you can only process one object per request.
The hAPI API may vary for each account as we continually release new versions and customize functionalities.
Integration Diagram
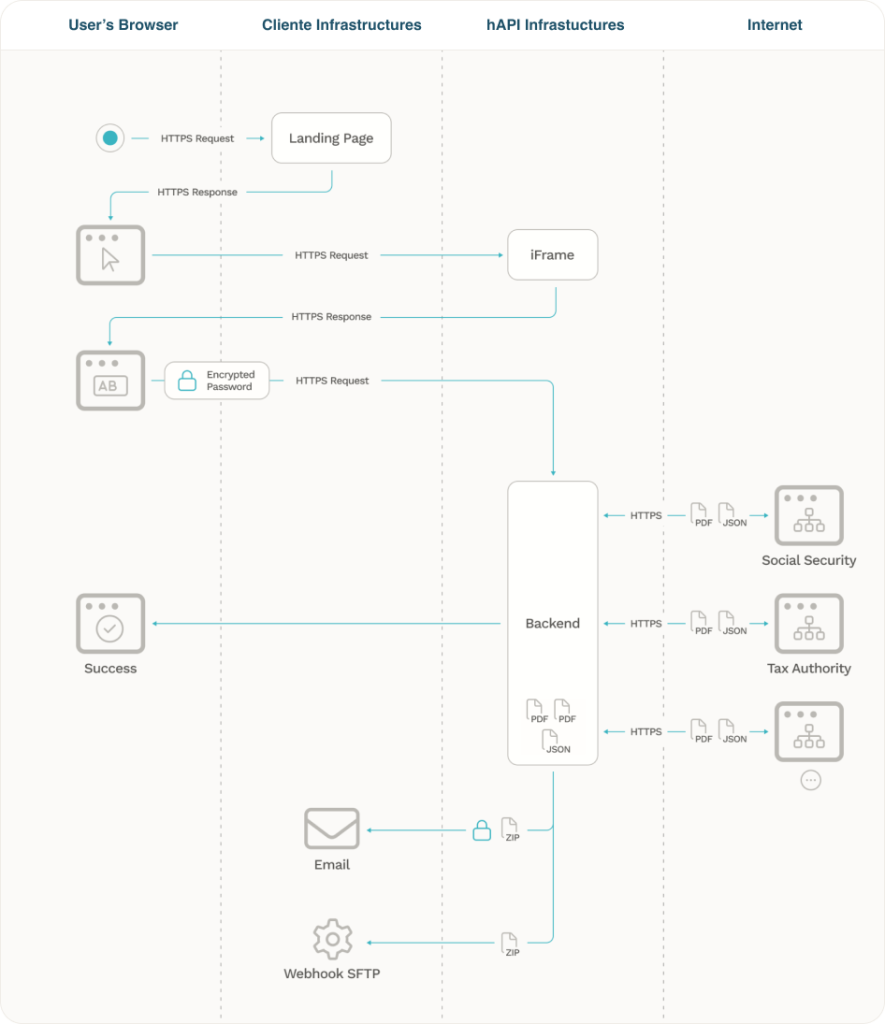
iFrame Information
To use our Iframe you can create a landing page on your infrastructure and simply add the code bellow script tag.
<script src="https://process.hapi.pt/hApiParent.js"</script>
These code will read the parameters from your website URL or from script data-attributes and add them to the iframe.
Add this script on the container that you want to insert the iframe, or use data-containerid attribute to insert the iframe inside that element.
<script src="https://process.hapi.pt/hApiParent.js" data-containerid="INSERT-YOUR-DIV-ID-HERE"</script>
Parameters can be passed as data attributes (data-[parameter name] in the iframe script, similar to the data-clientUserGuid example. These data attributes will override URL parameters.
<script src="https://process.hapi.pt/hApiParent.js" data-containerid="INSERT-YOUR-DIV-ID-HERE" data-clientUserGuid="INSERT-YOUR-CLIENTUSERID-HERE" data-processId="INSERT-YOUR-PROCESSID-HERE"></script>
Example
https://exampleSite.com?clientUserGuid=dc9c06-gg1c3d4-2dcb0a-185e7a-0b9387c&processId=457f600322624a599da9e0d65c128b4e
This Iframe dont use any cookie
Parameters
processId – Text that is used to identify the process and is returned on the callback. (Minimum 10 characters)
nif – NIF to pre fill the form with the Tax Number
niss – NISS to pre fill the form with the Social Security number
cmdPhoneNumber – Phone number to pre fill the form with the Chave Móvel Digital number
callerLogLevel2 – Used to identify the client or department (usefull in reports and to split costs and reports)
isTestMode – Used to test. If True the form are disabled. Just press the Authenticate button and you can use mock data
clientUserGuid – Id that identifies your user. Ask one to hAPI team. If you add it on the script below you don’t need to add it on the page URL.
clientId – id that identifies you as hAPI client. Ask yours to hAPI team. If you add it on the script below you don’t need to add it on the page URL.
data-containerid – Id of the HTML element where you want to place the iframe. If not set will add to the body.
stepsConfig– String that allows to configure the screen elements display. Could be 1 2 or 3 to show AT (1), SS (2), Upload docs (3). Ex: If set as 13 it will show only AT and Upload docs steps.
Script Event Messages
When an important event happens in our UI, a message event will be sent by the iframe, containing all the information about what happened.
There are currently two types of user-facing event that can be listened to.
(the event examples below are written in TypeScript)
stepComplete events are sent whenever the proponent completes one of the steps of the process.
					type StepCompleteEvent = {
    type: 'stepComplete'
    stepId: 'taxAuthority' | 'socialSecurity' | 'customFields'
}

const exampleEvent: StepCompleteEvent = {
    type: "stepComplete",
    stepId: "taxAuthority",
}
basicPostLoginDataUpdated events are sent shortly after the proponent successfully logs in with their credentials, if the Send Personal Data On Iframe configuration is set to true.
Please note that some data attributes may be omitted, when their information is unavailable or not applicable.
					type BasicPostLoginDataUpdatedEvent = {
    type: 'basicPostLoginDataUpdated'
    data: {
        PersonalTaxData?: {
            Nif: string
            Name: string
            Gender: string
            Address?: {
                Street?: string
                Door?: string
                Floor?: string
                City?: string
                District?: string
                County?: string
                Parish?: string
                Country?: string
                PostalCode?: string
                CountryAlpha3Code?: string
                recParsedAddress?: {
                    StreetCode?: string
                    CountyCode?: string
                    DistrictCode?: string
                    LocalityCode?: string
                    PostalCode4?: string
                    PostalCode3?: string
                    StreetName?: string
                    PostalDesignation?: string
                    StreetLocation?: string
                    Locality?: string
                    DoorNumber?: string
                    FirstPreposition?: string
                    SecondPreposition?: string
                    StreetType?: string
                    StreetTitle?: string
                    Section?: string
                    Floor?: string
                }
            }
            Contacts?: {
                Email?: string
                Phone?: string
                PhoneCountryCode?: string
                EmailStatus?: string
                PhoneStatus?: string
            }
            BirthDate?: string
            Birthplace?: {
                County?: string
                Parish?: string
                Country?: string
                District?: string
                CountryAlpha3Code?: string
            }
            Nationality?: string
            BankInformation?: {
                Iban?: string
                SWIFT_BIC?: string
                IbanStatus?: string
                InstitutionCode?: string
                InstitutionName?: string
            }
            NonHabitualResident?: {
                StartingYear?: number
                FinishingYear?: number
                CountryResidence?: string
            }
        }
    }
}

const exampleEvent: BasicPostLoginDataUpdatedEvent = {
    type: "basicPostLoginDataUpdated",
    data: {
        PersonalTaxData: {
            Nif: "112123031",
            Name: "ANTONIO MARIA MONTEIRO",
            Gender: "MASCULINO",
            Address: {
                Street: "Avenida Maria Luísa Costa Machado Faria e Maia N.20",
                Country: "PORTUGAL",
                PostalCode: "9560-314 Cabouco",
                CountryAlpha3Code: "PRT",
                recParsedAddress: {
                    StreetCode: "2140142",
                    CountyCode: "01",
                    DistrictCode: "42",
                    LocalityCode: "20747",
                    PostalCode4: "9560",
                    PostalCode3: "314",
                    StreetName: "Maria Luísa Costa Machado Faria e Maia",
                    PostalDesignation: "CABOUCO",
                    StreetLocation: "",
                    Locality: "Cabouco",
                    DoorNumber: "20",
                    FirstPreposition: "",
                    SecondPreposition: "",
                    StreetType: "Avenida",
                    StreetTitle: "",
                    Section: "",
                    Floor: "",
                },
            },
            Contacts: {
                Email: "<span
                data-original-string='u20bZrUpuXM4zG8T9rZQew==7acN5RTLzLpix+f1lsCHBMyWvvXFjKaVKSnMN7t3CVIBys='
                class='apbct-email-encoder'
                title='This contact has been encoded by Anti-Spam by CleanTalk. Click to decode. To finish the decoding make sure that JavaScript is enabled in your browser.'>an<span class="apbct-blur">**************</span>@<span class="apbct-blur">***</span>il.com</span>",
                Phone: "968848777",
                EmailStatus: "Fiabilizado",
                PhoneStatus: "Fiabilizado",
            },
            BirthDate: "1983-10-27T00:00:00Z",
            Birthplace: {
                County: "PORTO",
                Parish: "BOAVISTA",
                Country: "PORTUGAL",
                District: "PORTO",
                CountryAlpha3Code: "PRT",
            },
            Nationality: "PORTUGUESA",
            BankInformation: {
                Iban: "PT50001088233372181854802",
                SWIFT_BIC: "MPIOPTPL",
                IbanStatus: "IBAN Confirmado",
                InstitutionCode: "0007",
                InstitutionName: "NOVO BANCO, S.A.",
            },
            NonHabitualResident: {
                StartingYear: 2022,
                FinishingYear: 2032,
                CountryResidence: "BRASIL",
            },
        },
    },
}
To receive any of these events, add JavaScript similar to the following to your page:
					window.addEventListener('message', (event) => {
    if (
        event.origin === 'https://process.hapi.pt'
        && event.data
        && typeof event.data === 'object'
    ) {
        switch(event.data.type){
            case 'stepComplete':
                console.log('Step complete:', event.data.stepId)
                break

            case 'basicPostLoginDataUpdated':
                console.log('Basic post-login data updated:', event.data.data)
                break
        }
    }
})
JSON information
For detailed information on JSON responses and the structure of our API, clients can refer to our comprehensive documentation available at hAPI Swagger UI here.
This resource provides clear examples and specifications for all endpoints, ensuring that you have the necessary guidance to effectively integrate and utilize our services.
In addition to that user information we also send a JSON entity with the process status:
					ProcessInformation: {
    ProcessId: YOUR PROCESS ID,
    StartDateTime:"",
    SentDateTime:"",
    CallerLogLevel1:"",
    CallerLogLevel2:"",
    IsTestMode:false,
    EntryURL: URL_FROM_ORIGINAL_WEBSITE
    IsAllServicesRunned:true/false (If all services returned)
}
Attachments Information
Our API service facilitates the collection of various documents. For a complete overview of all documents collected by our API service, please visit the provided link containing dummy documents for demonstration purposes only.
These documents are not representative of real data but serve as examples to help you understand the types of information our API can handle
Below is a comprehensive list of all document types collected by our service:
ActivityStartCertificate.pdf
(CertificadoAtividade.pdf)
BankAccountsDataBaseCertificate.pdf (BaseDadosContasBancariasCertificado.pdf)
BuildingBookCertificate.pdf
(CadernetaPredial.pdf)
CentralCreditRegisterCertificate.pdf
(CertificadoCentralResponsabilidadesCredito.pdf)
EnergyCertificatePDFResume.pdf
(ResumoCertificadoEnergetico.pdf)
FamilyHouseHoldCertificate.pdf
(AgregadoFamiliarCertificado.pdf)
HouseRentContractReceiptCertificate.pdf
(RecibodeRenda.pdf)
IRSNonDebtCertificate.pdf
(CertidaoNaoDividaIRS.pdf)
InsolvencyProceedingPDF.pdf
(ProcessoInsolvencia.pdf)
NegativeLandRegistryCertificate.pdf
(ProcessoInsolvencia.pdf)
PDFATIbanProof.pdf
(IBANAutoridadeTributariaComprovativo.pdf)
PDFOfPersonalTaxData.pdf
(DadosFiscaisPessoais.pdf)
PDFOfTheFirstSalary.pdf
(PrimeiroSalario.pdf)
PDFOfTheLastSalary.pdf
(UltimoSalario.pdf)
PDFSSIbanProof.pdf
(IBANSegurancaSocialComprovativo.pdf)
TaxAddressCertificate.pdf
(CertidaoDomicilioFiscal.pdf)
TaxDeclarationCertificate_year.pdf
(DeclaracaoIRSCertificado_year.pdf)
TaxLiquidationDeclarationCertificate_year.pdf
(LiquidacaoIRSCertificado_year.pdf)
PersonalDataSSCertificate.pdf
(CertidaoDadosPessoaisSegurancaSocial.pdf)
MonthlyContributoryCareerCertificate_year.pdf
(CertidaoCarreiraContributivaMensal_year.pdf)
YearlyContributoryCareerCertificate_year.pdf
(CertidaoCarreiraContributivaAnual_year.pdf)
SSNonDebtCertificate.pdf
(CertidaoNaoDividaSS.pdf)
SicknessBenefitCertificate.pdf
(CertidaoBeneficiosDoencaParentalidade.pdf)
UnemploymentBenefitCertificate.pdf
(CertidaoDesemprego.pdf)
PensionerCertificate.pdf
(CertidaoPensionista.pdf)
For further details on how to retrieve and manage these documents, please refer to our API documentation here.
Test Users
To facilitate user testing, clients can enable test mode by using the parameter &IsTestMode=true. Additionally, if needed, clients can include the parameters nif and niss and cmdPhoneNumber to specify user identification
We have configured in our container 5 different users with different data
nif=112123031&niss=11951619107&cmdPhoneNumber=968848777
nif=144080540&niss=13971183917&cmdPhoneNumber=927138123
nif=185936059&niss=11459237611&cmdPhoneNumber=963287124
nif=245896660&niss=15965539501&cmdPhoneNumber=964251111
nif=201560097&niss=29256915890&cmdPhoneNumber=914582934
nif=531489957&niss=25314899575
For example, a test request could be structured as: &isTestMode=true&nif=185936059&niss=11321856270
This setup allows for safe testing without affecting live data, ensuring a seamless experience during the development phase.
Available Configurations
This chapter outlines the various fields available for client configurations in hAPI backoffice system. Each field plays a crucial role in managing client data and ensuring compliance with relevant regulations.
Name: The name of the client for identification purposes.
Email: The email address associated with the client, used for communication and notifications. If filled in, all processes
will be sent to this email.
Intro HTML: Custom HTML content used for introductory messages or information displayed to the client. This text will appear on top of the page, after the header.
Text Consent AT: Text that describes consent requirements specific to Tax Authority.
Text Consent SS: Text that describes consent requirements specific to Social Security (SS).
Cookies Policy HTML Content: The HTML content outlining the client’s cookie policy.
Consent Main Block Title: The title for the main consent section, which outlines user permissions and agreements.
Text Consent Main Block: Detailed text regarding the consent terms presented to the user.
Process Conclusion Text: A message displayed to the client upon completion of a process.
Client URL Page: The URL that directs to the client-specific page within the application. The Landing page that have the Iframe.
Is Show Steps after Previous Success: Determines if the next steps should be displayed after a successful action. If true
the SS login will only appear after AT successful Login, and Additional Documents after SS successful login.
Is Show Cookies Policy: Indicates whether the cookies policy should be shown to the client.
Get Last Tax Declaration With Liquidation Proof: A toggle for retrieving the last tax declaration along with proof of liquidation. If true, and the last tax declaration don’t have liquidation declaration, we will try to collect the previous year one is Get Tax Declaration With Liquidation Proof (need getTaxDeclarationLiquidationRelation service active).
Get Two Tax Declarations: If checked, our service will attempt to collect the last two tax declarations for the client.
Use Single and No Dependents as Default: Specifies whether the default setting should apply to single clients without dependents. If set to true, our service will use “single and no dependents” to calculate net salary in cases where family household information is missing.
Has CMD Login on AT: Indicates if the client has Chave Móvel Digital login for Tax Authority.
Has CMD Login on SS: Indicates if the client has Chave Móvel Digital login for Social Security.
Is CMD Default Option: Specifies if Chave Móvel Digital is the default option for the client.
Send Personal Data On Iframe: If true, we will send a basicPostLoginDataUpdated event message containing personal data collected by the iframe. Used to have personal data on the interface.
Number of Months of Income to Return: Defines how many months of income data should be returned for the client. If ‘6’ we will grab information of incomes and payments from last 6 months.
Number of Months to Get Expenses: Specifies how many months of expense data should be retrieved. If ‘6’ we will grab information of expenses from last 6 months.
Green Receipts Months Number: The number of months for which green receipts should be considered. If ‘6’ we will grab information of green receipts and invoices from last 6 months.
Remove Fields: A field that allows specifying which fields should be removed from JSON outputs.
Waiting Time Before Send Data (in Seconds): When the proponent enters their credentials for a service (Tax Authority or Social Security), we will send collected data to the endpoint as soon as we finish downloading all of it from that service.
This setting can be used to add a delay (measured in seconds), to give the proponent time to input their credentials for another service, or upload any necessary documents, before we send the data that has been gathered from all sources.
Send Data Seconds After Login: When the proponent enters their credentials for a service (Tax Authority or Social Security), we will normally only send collected data to the endpoint after we finish downloading all of it from that service.
This setting, if enabled, can be used to specify a duration such that, if we are still in the process of downloading data after that many seconds have passed since the proponent entered their credentials, the partial data collected so far will be immediately sent. When more data finishes downloading, all data collected until that moment will be sent again (including the data that was previously sent, too).
Send Data Seconds After Last Send: When the Send Data Seconds After Login setting is enabled, In order to avoid resending too many updates with incremental data in a short period of time, we will only send updated data to the endpoint for a given process at most once every few seconds.
This setting can be used to customise how far apart (in seconds) sending those updates should be.
Page Redirect URL: The URL to redirect the client after the successful login.
Data Endpoint: The endpoint used for data retrieval or submission, where we will deliver information on clients servers.
Data Endpoint User: The username associated with the data endpoint.
Data Endpoint Token: The token used for authenticating requests to the data endpoint.
Endpoint Test Configuration: The endpoint user and token to be used only for test users.
Data Encryption Password: The password used for encrypting client data.
Iframe Domains Allowed: A list of domains permitted to embed content via iframe.
Callback Configuration
After we collect all the data we will send the information through the methods. You can choose Email + SFTP or Webhook, of just SFTP or Webhook.
The information will be sent after X (configurable) seconds. If we take more than that time, we will send a second third … package will all the information collected (its cumulative). In case of delivery failure (by SFTP or Webhook) we retry every 10 minutes unitl we get success or 3 repeats. Our SFTP and Webhook requests are made through an static IP – 35.207.159.11
Email
Information could be sent by email, to a list of emails;
Email subject will be the users NIF;
Information can be encrypted with a shared password. In these case, the subject will be the process ID.
SFTP
We can send information do an SFTP server. We can configure the endpoint, the port, username and password do access, and the destination folder;
We will create a zip file with the name processID_YYYYMMDDHHMMSS
WEBHOOK
We can send information to a webhook. This webhook can be protected with an APIKEY sent in the header request in a parameter named “Authorization” or “Authentication”;
The ZIP file will be sent the the body as a binary;
The processId will be sent as a “guid” parameter at the end of the URL and on the Header as “CallerProcessId”
The Content-Type will be application/zip. The Accept-Encoding nad Accept-Language will be sent as *The request will be sent by our server with fixed IP
CSS customization
CSS can be customized by us, or if you prefer you can send us a CSS link and we add it to our iframe page.